Snooping out a web API
While writing Backupdoit I needed to access data from the doit.im server. At the time of writing this, doit.im doesn’t appear to provide any documentation on their web API or encourage 3rd party usage. Therefore in order to see the data as it is downloaded from the doit.im site, so I could fetch and process that same data in my application, I had to snoop the HTTP traffic.
Being an embedded developer in my day job, dealing with RESTful web APIs and all that good stuff is a bit off-track for me. However, given that embedded devices are only going to get more connected to the web/cloud/IOT/whatever it’s called this week, here are a few pointers on how I did it for anyone in a similar position.
When faced with the prospect of gathering network data flowing between two hosts, it is tempting to whip out tcpdump and/or Wireshark and set ‘em running. For the simple case of having a look at some HTTP traffic though, that would certainly be an instance of using a sledgehammer to crack a walnut. Both in the sense that there is the overhead of learning the tool if needs be, but also because, like a powdered mess of walnut and shell crumbs scattered everywhere, the data of interest will be buried in a spew of TCP packets along with all the other network traffic at the time of capture. (This might well be overcome in Wireshark by using filters to just view HTTP packet contents to and from the host of interest, but again, there is overhead to accomplishing that if you’re not a regular Wiresharker)
What is needed is a tool intended specifically for HTTP traffic analysis. At first I tried mitmproxy. This fires up a proxy server on your local machine, the web traffic of interest then needs to be directed through the local proxy, for that I settled on the FoxyProxy extension in Firefox. The advantage of this setup is that FoxyProxy allows you to set up proxy filters, so I could direct just traffic between the doit.im domain through the proxy server, and mitmproxy shows the HTTP requests seperately in neat little summaries, just for the requests I’m interested in.
Go to the login page of the site of interest (In this case doit.im), enable the proxy in FoxyProxy, then login. Then have a look at what came through mitmproxy. In between the GET requests for HTML pages and graphics etc, fairly early on there is a POST request.
POST https://i.doit.im/signin?original=https://i.doit.im/
	← 302 text/plain [empty content]
Select that in mitmproxy to view in more detail, first the request:
Host:              i.doit.im
User-Agent:        Mozilla/5.0 (X11; Ubuntu; Linux i686; rv:16.0) Gecko/20100101 Firefox/16.0
Accept:            text/html,application/xhtml+xml,application/xml;q=0.9,*/*;q=0.8
Accept-Language:   en-US,en;q=0.5
Accept-Encoding:   gzip, deflate
Connection:        keep-alive
Referer:           https://i.doit.im/signin?original=https%3A%2F%2Fi.doit.im%2F
Cookie:            __utma=91039877.424430117.1368041771.1383766187.1383856171.39; __utmz=91039877.1368041771.1.1.utmcsr=(direct)|utmccn=(direct)|utmcmd=(none);
	           PLAY_LANG=en; __utmb=91039877.1.10.1383856171; __utmc=91039877
Content-Type:      application/x-www-form-urlencoded
content-length:    37
content-encoding:  deflate
[decoded deflate] Raw                                                                                                                                   [m:Raw]
username=mytestusername&password=mytestpassword
Then press tab to see the response:
Server:          nginx/1.3.14
Date:            Thu, 07 Nov 2013 20:35:17 GMT
Content-Type:    text/plain; charset=utf-8
Content-Length:  0
Connection:      keep-alive
Location:        https://i.doit.im/
Set-Cookie:      DOITIM_FLASH=;Expires=Thu, 7-Nov-13 20:35:17 GMT;Path=/;Domain=.doit.im;Secure
Set-Cookie:      autologin=5aa9ad19-779e-4da4-96b8-f87153b0e5f0;Expires=Sat, 7-Dec-13 20:35:17 GMT;Path=/;Domain=.doit.im
Set-Cookie:      DOITIM_SESSION=;Expires=Thu, 7-Nov-13 20:35:17 GMT;Path=/;Domain=.doit.im;Secure
Set-Cookie:      DOITIM_ERRORS=;Expires=Thu, 7-Nov-13 20:35:17 GMT;Path=/;Domain=.doit.im
Cache-Control:   no-cache
From this we can see a couple of things. Firstly, the URL to which the login credentials are submitted is https://i.doit.im/auth, the name is a giveaway, but also the credentials can be seen in the body of the POST request: username=mytestusername&password=mytestpassword. If it seems alarming that the password is visible, remember this is going over HTTPS, in order for mitmproxy to see this you would have had to confirm the security exception for the proxy server certificate before continuing to the website.
We can also see in the response that some cookies are set, the important one is autologin, as long as that is sent back with every subsequent HTTP request, the requests pertain to the logged in user.
So thats the authentication sorted, what of the actual data for the web application? Back to the list of requests again, the trick then is again to ignore all the requests with text/html or image/png etc, they are just the HTML UI elements getting loaded. Instead, look for requests with type application/json, like this one:
GET https://i.doit.im/api/tasks/inbox
       ← 200 application/json 951B
Request:
Host:              i.doit.im
User-Agent:        Mozilla/5.0 (X11; Ubuntu; Linux i686; rv:16.0) Gecko/20100101 Firefox/16.0
Accept:            */*
Accept-Language:   en-US,en;q=0.5
Accept-Encoding:   gzip, deflate
Connection:        keep-alive
Content-Type:      application/json; charset=utf-8
X-Requested-With:  XMLHttpRequest
Referer:           https://i.doit.im/home/
Cookie:            __utma=91039877.424430117.1368041771.1383856171.1383940786.40; __utmz=91039877.1368041771.1.1.utmcsr=(direct)|utmccn=(direct)|utmcmd=(none);
	           PLAY_LANG=en; __utmc=91039877; __utmb=91039877.3.10.1383940786; autologin=1c93e8c6-8b36-4f67-af80-4d0992998e2f
Response:
Server:             nginx/1.3.14
Date:               Fri, 08 Nov 2013 20:30:38 GMT
Content-Type:       application/json; charset=utf-8
Transfer-Encoding:  chunked
Connection:         keep-alive
Set-Cookie:         DOITIM_FLASH=;Expires=Fri, 8-Nov-13 20:30:38 GMT;Path=/;Domain=.doit.im;Secure
Set-Cookie:         DOITIM_SESSION=;Expires=Fri, 8-Nov-13 20:30:38 GMT;Path=/;Domain=.doit.im;Secure
Set-Cookie:         DOITIM_ERRORS=;Expires=Fri, 8-Nov-13 20:30:38 GMT;Path=/;Domain=.doit.im
Cache-Control:      no-cache
Content-Encoding:   gzip
We can see that the GET request to https://i.doit.im/tasks/today included the autologin cookie, and the response contained the json data we are interested in.
cURL it in
In order to double check these findings, cURL can be used to perform the same requests and see the data in the response. Firstly, perform a login by gathering the autologin cookie into a cURL “cookie jar” with a POST request:
$ curl -c doit.im_cookies -d username=mytestusername -d password=mytestpassword https://i.doit.im/signin
$ cat doit.im_cookies
# Netscape HTTP Cookie File
# http://curl.haxx.se/docs/http-cookies.html
# This file was generated by libcurl! Edit at your own risk.

.doit.im	TRUE	/	FALSE	0	i18next	en
.doit.im	TRUE	/	FALSE	0	PLAY_LANG	en
.doit.im	TRUE	/	FALSE	1403139796	autologin	948b3e87-6317-455c-af42-f8378c22a0d9
#HttpOnly_i.doit.im	FALSE	/	FALSE	0	connect.sid	s%3A1a8Z0orSfDMNuy4e1gIjGgj0.JCOxmo70mnO41U5pt2V%2B26rpP0RmZUT4jvrosY8j2W4
Then do a GET of the “inbox” tasks data:
$ curl -b autologin=948b3e87-7316-455c-af42-f8378c22a0d9 https://i.doit.im/api/tasks/inbox
{"entities":[{"attribute":"inbox","all_day":true,"start_at":0,"end_at":0,"context":"3f5835bf-c428-47e0-a887-2ed42d7dd102","priority":1,"sent_at":0,"tags":["Test tag"],"now":false,"pos":0,"estimated_time":0,"spent_time":0,"uuid":"c946458c-db30-4a9f-9b18-8729a7565bea","title":"Delete a task","usn":44,"created":1383116299982,"updated":1396380465311,"deleted":0,"trashed":0,"completed":0,"archived":0,"hidden":0,"id":"5270ae0be4b0be632d43c1bf","type":"task"}],"server_time":1400548147201}
A simpler option
After switching laptops and installing a later version of Ubuntu, mitmproxy just wouldn’t run anymore, either from the apt or pip installs. I’d had a long break from this little project and I wanted to get on and just look at the HTTP messages, not spend time fiddling with Python packages, so in a pinch had a look around for other options. That’s when I found a much easier option: Firefox.
Firefox version 23 onwards provides a network console which shows all the detail needed on HTTP requests made for the current tab, no messing needed:
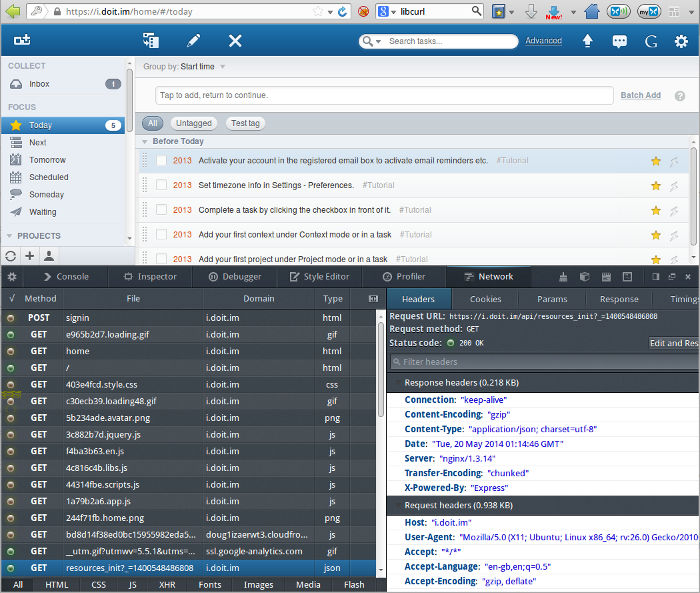
|
| Note the JSON GET request selected, and the initial login POST request at the top of the list. |
Once I realised I had this toolbox sat under my nose all along, I haven’t looked back.
Doin’ it in code
Re-writing code to do HTTP accesses from scratch makes little sense in all but the most constrained environments. Many libraries, frameworks and scripting languages provide APIs to handle all the HTTP details for you, or libcURL provides bindings for lots of languages and is used in many systems including consumer devices. I was using Qt, which provides the slightly mis-named QNetworkAccessManager, which actually provides HTTP/HTTPS accesses specifically.
To try out QNetworkAccessManager I put together a little test project called qt-netmanager-example. The code is fairly self explanatory, and when built provides the ability to make GET and POST requests.
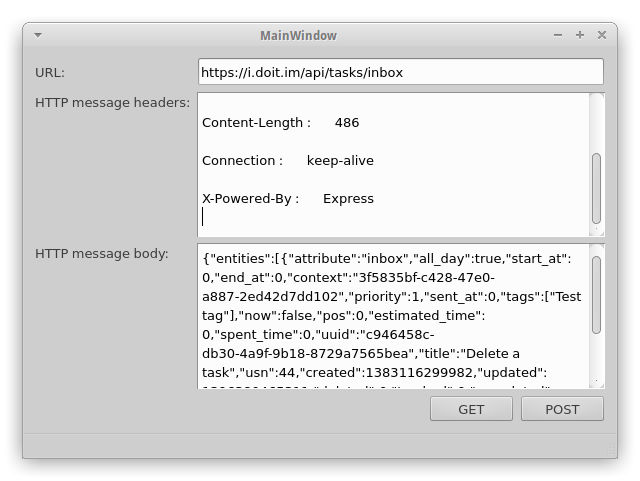
|
| qt-netmanager-example after making a GET request. |
In order to use the example to access JSON data, first obtain the autologin cookie by entering https://i.doit.im/signin into the URL box, and the login credentials username=myusername&password=mypassword into the HTTP message body box, then click POST. The cookies received in the reply will then be shown in the HTTP message headers box, these don’t need to be re-entered or anything, the QNetworkAccessManager will store and resend them for all further requests to the same domain while the program is running. Having logged in, make a request to retrieve some data by entering, say, https://i.doit.im/api/tasks/today into the URL box and click GET.
If you plan on using Qt, this example code is easy to adapt for use in your own app.
After getting at the data, all that remains is to make use of all that lovely JSON, or whatever is sent in the web API of interest, in your own application. Which is a topic for another day.