Setting up a QNX image for use with Qt Creator
Here is a tutorial on how to set up your QNX image to make it work with Qt Creator, then some explanation on configuring Qt Creator itself for QNX with Qt 5.
The microkernel based RTOS, QNX, has remote debugging on the target pretty much nailed down out of the box. Various plugins in the Eclipse based Momentics IDE, included as part of the QNX development suite, provide one click download and debugging, as well as all sorts of application and system level profiling and analysis. So why would anyone need to use Qt Creator to debug with QNX?
Well, the GUI landscape on QNX is changing. The entire graphics driver stack on the platform (libgf, io-display and Photon) is being replaced by a new framework called Screen (No relation to the GNU tool of the same name). The Photon GUI subsystem has been obsoleted by virtue of the fact that it doesn’t work with Screen, and so Qt is fast becoming the default GUI solution on QNX, especially as it now has Qt 5 support for Screen.
So given that Qt will be the obvious choice for GUI development on QNX, developers experienced with Qt who find themselves working with the platform will likely want to stick with the Qt IDE for developing their applications. Others may have an application which is deployed across various target platforms, and don’t want to switch to a whole seperate IDE every time they want to try out new features in their Qt app on the QNX build. Or perhaps you just like using Qt Creator.
Setting up Qt Creator for QNX is covered elsewhere online, such as on the Qt Project website. However, that tutorial and others like it don’t tend to cover the setup needed within a non-Blackberry QNX system on the board side, which is where I will concentrate the attention here. I’ll then describe the setup of Qt Creator briefly after that.
Get your target ready
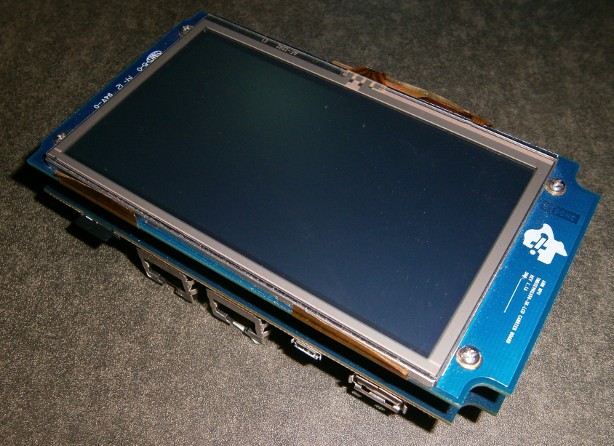
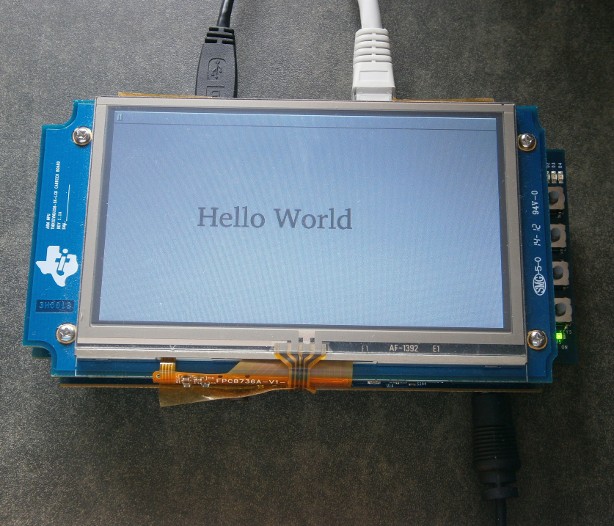
In order to follow this guide, you’ll need to be using a board (Or SoC at least) which has Screen support in QNX 6.5.0 SP1. At the time of writing, QNX’s UI Early Access Program is the only way to get hold of Screen driver binaries. Joining that program gives access to a Foundry27 project which also provides Qt binaries built for Screen on QNX. Lets say as a pre-requisite you have built the QNX BSP for your board, added Screen drivers and libraries to it, have QNX running, can run gles2-gears and see the gears spinning on whatever display is attached to the board. In this example, I used the Texas Instruments AM335x Starter Kit board.
|
| Texas Instruments AM335x Starter Kit board |
You’ll then need to add Qt to QNX. Now, your first thought might be to add the binaries to the IFS image, there are two problems with this. First, your generated IFS file becomes big and unwieldy, not only that but the more stuff you put in there, the more often you’ll need to re-write that large image to your boot medium for your board when you want to change something. Secondly, when it comes to remote debugging from Qt Creator later, it will expect to be able to copy files to various remote paths on your target via ssh, and the Image File System mounted in the IFS image is non-writable. In the simplest scenario, only a writable /tmp is needed to copy the binary to and a read/writable /root which the QNX remote deployment steps for a QNX device executes some commands in.
The simplest way to get a fully writable filesystem tree in QNX is to mount a read-write filesystem over /. On the Starter Kit board I mount the FAT32 partition on the SD card over / using the following command in the IFS startup script:
mount -t dos /dev/hd0t11 /
Ensure that the SD card driver is already started before that point, using the dos exe=all,umask=0077 option.
Now you can copy the Qt libraries to the SD card or other writable FS, and not have to worry about rebuilding and copying a huge IFS image everytime you want to make changes to it. An SD card with FAT32 is only one way of accomplishing this, alter steps which follow regarding the SD card accordingly if you’re not using an SD card for your writable file system.
Obtain the file Qt5-5.1.0-qnx-armv7le-qcc-QNX6.5.0SP1-debug.tar.gz or similar from the EAP Foundry27 project. Create the directory /opt/qt5 in the root directory of the FAT32 FS on the SD card. Extract the archive and from opt/qt5/ copy the following directories to opt/qt5/ on the SD card:
- imports
- lib
- plugins
- qml
Next comes ICU, which is the localisation back end in Qt5. Thankfully a build of it for QNX is provided alongside the Qt5 binaries on Foundry27. Obtain icu-49-qnx-20121203.tar.gz, again from the EAP Foundry27 project. Extract the archive and copy everything under the armle-v7/ directory to the root of the SD card.
By now your SD card should contain something like this:
<SD_card_root>/
	opt/qt5/
		imports/
		lib/
		plugins/
		qml
	bin/
	lib/
	sbin/
Your tree may contain more items, if you’ve put Screen on the SD card instead of in the IFS image for example.
As well as mounting the SD card over /, there are a few more changes to make in your IFS image.
Environment variables
At the end of your IFS startup script, add the following commands to ensure the environment is set up correctly to run Qt programs:
PATH=:/proc/boot:/sbin:/bin:/usr/sbin:/usr/bin:/opt/qt5/bin
LD_LIBRARY_PATH=/proc/boot:/lib:/usr/lib:/lib/dll:/usr/lib/graphics:/usr/lib/graphics/am335x:/opt/qt5/lib
GRAPHICS_ROOT=/usr/lib/graphics/am335x
QQNX_PHYSICAL_SCREEN_SIZE=95,54
Change the path for Screen at the end of LD_LIBRARY_PATH according to the directory for your Screen drivers. The QQNX_PHYSICAL_SCREEN_SIZE variable is the only Qt related variable needed in your QNX environment and, as the name suggests, should reflect the physical size of the display in millimetres, so that Qt can adjust its font sizes and such.
sshd
Now, later on when you run a program from Qt Creator on the target board, it is going to try and connect to the target through ssh in order to copy the binary to it (With sftp). Then the program will be launched in an ssh session. This means two things: there must be an ssh server running on the target, and a session when logging in through ssh must have the same environment set up that the prompt on the serial port prompt inherits from the image startup script above. So ensure sshd is added to the image and either runs at boot or is run manually before trying to deploy from Qt Creator. For the environment, the file /etc/profile must contain the environment variables needed. For example, add the following to the image build file, which provides passwordless root login, sshd launch via inetd, and some commands which Qt Creator expects to be able to run when connected through ssh:
/etc/passwd=${QNX_TARGET}/etc/passwd
/etc/group=${QNX_TARGET}/etc/group

/usr/bin/ssh-keygen=ssh-keygen
/usr/sbin/sshd=sshd
/usr/lib/libcrypto.so.2=libcrypto.so.2
[type=dir] /var/chroot
[type=dir dperms=0700] /var/chroot/sshd


[type=dir] /etc/ssh
/etc/ssh/sshd_config={
Protocol 2
LoginGraceTime 600
PermitRootLogin yes
PasswordAuthentication yes
PermitEmptyPasswords yes
PrintMotd no
Subsystem	sftp	/usr/libexec/sftp-server
}

[type=dir] /usr/libexec
/usr/libexec/sftp-server = ${QNX_TARGET}/${PROCESSOR}/usr/libexec/sftp-server

/etc/services=${QNX_TARGET}/etc/services

/etc/inetd.conf={
ssh stream tcp nowait root /usr/sbin/sshd in.sshd -i
}

/etc/profile={
export PATH=:/proc/boot:/sbin:/bin:/usr/sbin:/usr/bin:/opt/qt5/bin
export LD_LIBRARY_PATH=/proc/boot:/lib:/usr/lib:/lib/dll:/usr/lib/graphics:/usr/lib/graphics/am335x:/opt/qt5/lib
export GRAPHICS_ROOT=/usr/lib/graphics/am335x
export QQNX_PHYSICAL_SCREEN_SIZE=95,54
}

inetd
random

/bin/chmod=chmod
/bin/kill=kill
/bin/mkdir=mkdir
/bin/ps=ps
/bin/uname=uname

/usr/bin/awk=awk
/usr/bin/grep=grep
/usr/bin/netstat=netstat
/usr/bin/printf=printf
/usr/bin/sed=sed
/usr/bin/sleep=sleep
Chances are you may have some of these files in your image already, but you need to ensure some of them are in the right directories as shown. That is because when ssh connects to a target it inherits a minimal environment from the server before it starts a shell, which includes a minimal set of directories in PATH. Qt Creator seems to run some of the utilities in that state when deploying the application, but uses the shell environment to actually run the application.
Boot the board, and run the following commands:
# /proc/boot/random -t -p
# ssh-keygen -q -t dsa -f /etc/ssh/ssh_host_dsa_key -N ''
# ssh-keygen -q -t rsa -f /etc/ssh/ssh_host_rsa_key -N ''
# mkdir /root
Then at every boot thereafter, ensure the following are run:
# /proc/boot/random -t -p
# inetd
Random is needed otherwise sshd has trouble loading its keys. Inetd will run sshd for you when connections to port 22 are made.
Test connecting to the board from your development host:
$ ssh root@<board_ip>
If you get a root shell prompt without entering a password, thats good (Well, it is for a development system, best not to deploy it in production that way). If you couldn’t log in, perhaps ssh reports “Connection refused”?, try running
# /usr/sbin/sshd
at the command line on the board and see what it says.
In your ssh session try running an OpenGL ES program:
# gles2-gears
If the spinning gears appear on the display connected to the board, you’re all set to move on to Qt Creator. If not, try running the same gears demo from the serial prompt on the board. If OpenGL ES works from the serial prompt but not through ssh, theres something wrong with your environment.
Ensure qconn is running on the board also, as the remote execution steps for a QNX device in Qt Creator expect pdebug (Which is launched by qconn for you) to be functioning as the remote debug server on the board.
Setup Qt Creator
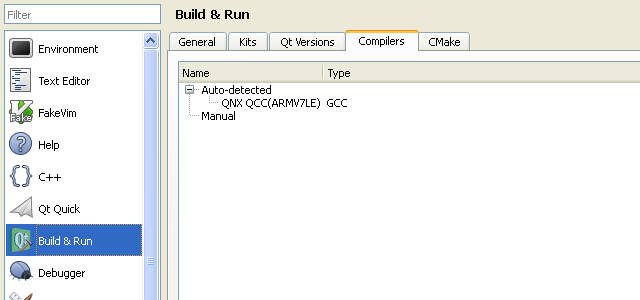
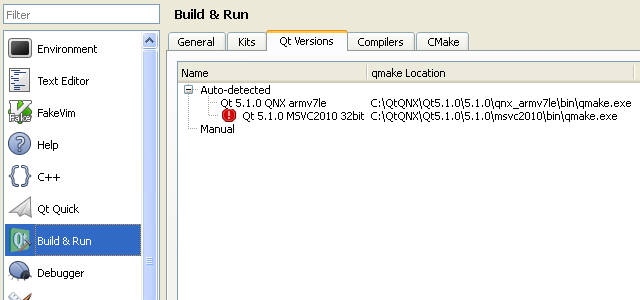
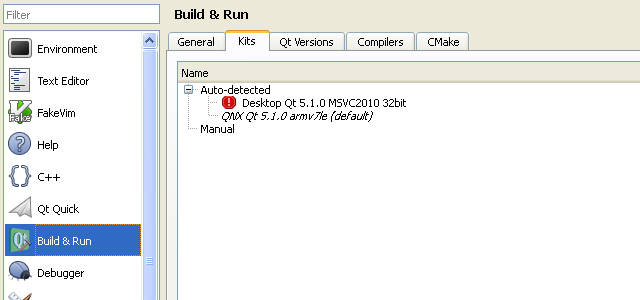
A Qt host SDK installation targetted for QNX is available on the EAP Foundry27 project, install the file named something like QNX-armv7le-Qt5_1_0-SDK-20130718.exe in Windows alongside the QNX SDP. Then inspect the Qt installation by launching Qt Creator and navigating to “Tools”->”Options…”->”Build & Run”, you should see the ntoarm-qcc compiler, the Qt 5.1.0 built for QNX on ARM, and a QNX kit listed as autodetected under the “Compilers”, “Qt Versions” and “Kits” tabs respectively.
|
|
|
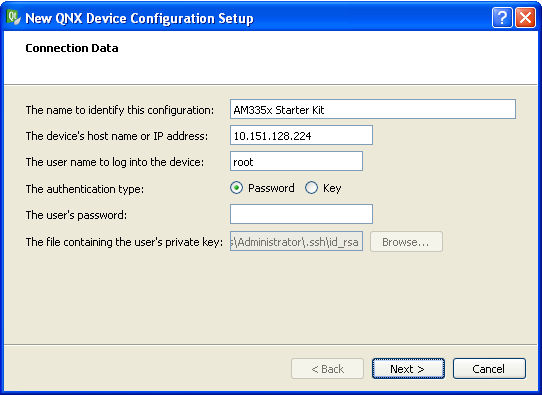
With the “QNX Qt 5.1.0 arm7le” kit ready to go, setup a QNX device in Qt Creator. In the options window, select “Devices” and click “Add…”. Select “QNX Device” and click “Start Wizard”. Enter root as the user, leave the password field blank and ensure “Password” is selected as the authentication type:
|
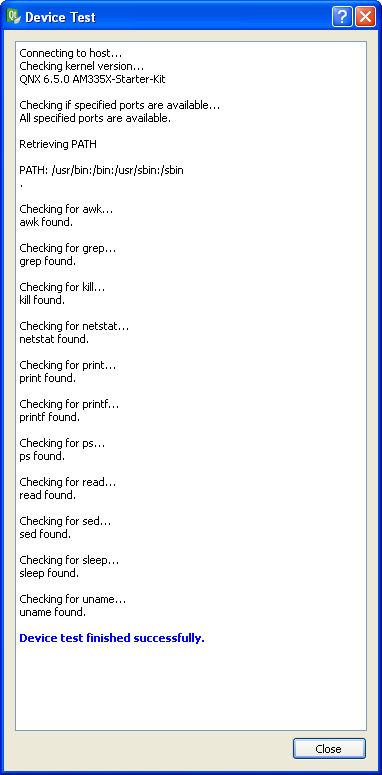
After finishing the wizard, ensure the new QNX device is selected in the Device: drop-down, and click Test. You should see output in the test dialogue box similar to:
|
| Note the reduced pre-shell PATH mentioned earlier |
Configure a project
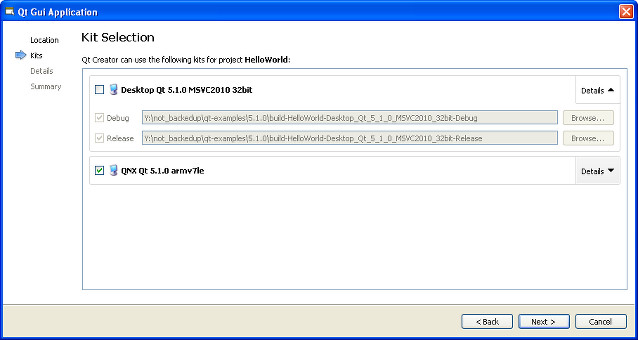
Now to create a project and build it. Do this as normal in Qt Creator, here I selected Qt Gui Application in the new project wizard, be sure to choose the QNX Qt kit for the project.
|
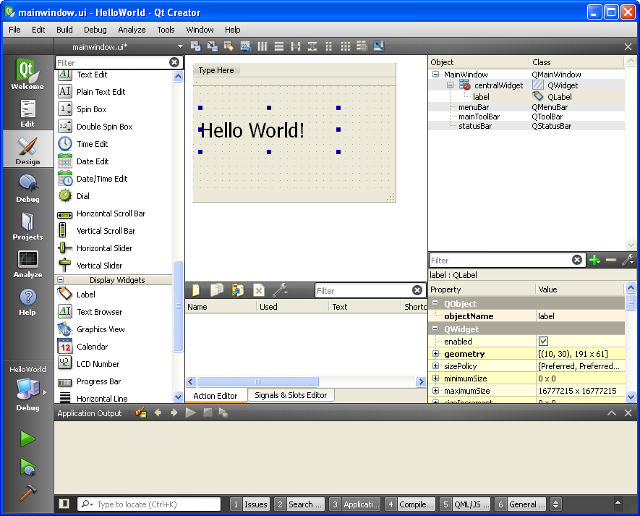
For this brief run through, lets just do the usual tutorial thing plonk a label with the usual contents in the middle of the form.
|
Click the build button and the MOC will be invoked as usual followed by the qcc compiler, producing a binary for QNX.
Try it out
Click the run button and, all being well, the application output pane should show the following:
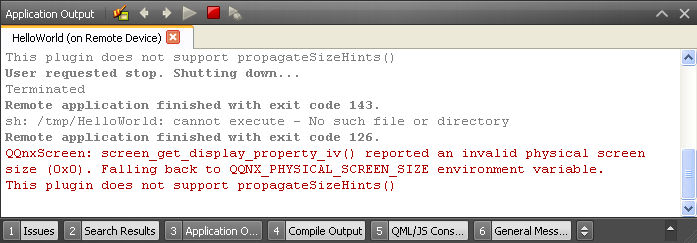
|
| The message regarding propagateSizeHints() can be ignored apparently |
And:
|
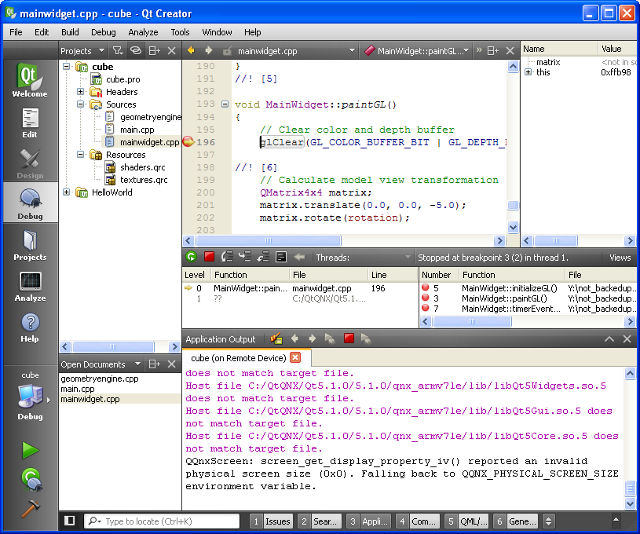
Or click debug and set breakpoints/step as usual:
|