Rescuing a broken secure boot enabled i.MX6
Freescale’s i.MX6 chips have rather comprehensive secure booting capabilities. When enabled, the High Assurance Boot (HAB) framework in the chip allows only signed binaries to be loaded by the on-chip boot ROM. The code signing is based on assymetric cryptographic keys, the public keys are burnt into OTP registers on the chip. Here I describe how I got the process of enabling i.MX6 secure boot wrong, then after despairing that the customer’s shiny new £400 SabreSD board was now unbootable, managed to recover it with JTAG.
First of all, there are plenty of guides on how to enable secure boot using HABv4 on i.MX6, so rather than re-hashing that information here, have a look at:
- Application Note 4581: Secure Boot on i.MX50, i.MX53, and i.MX 6 Series using HABv4 from Freescale
- the i.MX 6 Linux High Assurance Boot (HAB) User’s Guide (Document number IMX6HABUG) from the Freescale i.MX6 Sabre Linux BSP release L3.0.35_4.1.0 (see here, login required)
- the iMX6 SECURE BOOT on Nitrogen 6X SOM module guide from the RISE Lab at the Indian Institute of Technology Madras.
Having read those, there are some important points to pick up on. Each of those guides gives essentially the same steps, but with slightly different instructions. For those readers who are just skimming and didn’t read the above documents, roughly the steps are:
- Prepare U-boot and Linux with extra boot image layout (Image Vector Table) and calls in U-boot to the HAB functions in the on chip ROM. (The Freescale L3.0.35_4.1.0 i.MX6 Linux BSP has all these patches built-in, this project was based around the offerings in the Yocto Dora Freescale Community BSP, which complicated things somewhat)
- Get the Freescale HAB Code Signing Tools (CST) and secure boot scripts, a collection of Bash scripts and a few x86 Linux binaries. Run a script in the CST bundle to build a set of RSA public/private key pairs, referred to as the Public Key Infrastructure (PKI) tree. Each key pair is referred to as a Super Root Key (SRK)
- Using the secure boot scripts, combined with the CSTs, sign the U-boot and Linux images using the private keys (Which should indeed be kept private, to ensure that only authorised parties can create signed images)
- Using either the i.MX specific otp commands in U-boot, or some i.MX sysfs nodes under Linux, write a hash of each of the SRKs to the One Time Programmable (OTP) fuses in the i.MX6 chip.
- Check that the HAB enabled U-boot does not report any HAB events after being loaded by the on-chip bootloader, or after authenticating the Linux image
- Once all is well, set the chip into secure mode by setting a bit in another OTP fuse. At that point, only correctly signed images can be loaded.
It all looks good, ‘til it’s not
You can tell the CSTs to generate between one and four key pairs. The SRK hash for each public key is a pair of 32 bit values (For the 32 bit eFuse registers). The guides all say create four key pairs, then program all 8 SRK hash values into the fuses. Trouble is, I decided that rather than blindly follow the instructions and load all 8 SRK hashes in, I would just load one in. That way, if it went wrong somehow, I’d still have 3 more chances to get it right.
So having signed my images, and written the hash for a single key pair to the OTP fuses, I duly ran U-boot and checked for HAB events when it was loaded, and then when the Linux image is loaded:
U-Boot 2013.04 (Nov 25 2013 - 14:15:12)

CPU:   Freescale i.MX6Q rev1.2 at 792 MHz
CPU:   Temperature 38 C, calibration data: 0x5744b77d
Reset cause: POR
Board: MX6Q/SDL-SabreSD
Board version is 2 and u-boot version is 2
I2C:   ready
DRAM:  1 GiB
MMC:   FSL_SDHC: 0, FSL_SDHC: 1, FSL_SDHC: 2

In:    serial
Out:   serial
Err:   serial

HAB Configuration: 0xcc, HAB State: 0x99
No HAB Events Found!

Found PFUZE100! deviceid=10,revid=11
Net:   FEC [PRIME]
Warning: FEC using MAC address from net device

Hit any key to stop autoboot:  0
mmc0 is current device
reading boot.scr
reading uImage
4653088 bytes read in 271 ms (16.4 MiB/s)
Booting from mmc ...
reading imx6q-sabresd.dtb
34526 bytes read in 18 ms (1.8 MiB/s)

Authenticate uImage from DDR location 0x12000000...

HAB Configuration: 0xcc, HAB State: 0x99
No HAB Events Found!

## Booting kernel from Legacy Image at 12000000 ...
   Image Name:   Linux-3.12.0-fslc+g928c8b1
   Image Type:   ARM Linux Kernel Image (uncompressed)
   Data Size:    4640808 Bytes = 4.4 MiB
   Load Address: 10008000
   Entry Point:  10008000
   Verifying Checksum ... OK
## Flattened Device Tree blob at 18000000
   Booting using the fdt blob at 0x18000000
   Loading Kernel Image ... OK
OK
   Using Device Tree in place at 18000000, end 1800b6dd

Starting kernel ...

Booting Linux on physical CPU 0x0
Linux version 3.12.0-fslc+g928c8b1 (elangley@badkitty) (gcc version 4.8.1 (GCC) ) #1 SMP Mon Nov 25 12:05:11 GMT 2013
CPU: ARMv7 Processor [412fc09a] revision 10 (ARMv7), cr=10c53c7d
......
The lines reading “No HAB Events Found!” give the all clear that firstly, the signed U-boot image was successully authenticated by the HAB calls in the on-chip bootloader, then secondly that the Linux image was authenticated by U-boot making calls back into the HAB code in on-chip ROM.
So the moment of truth comes, and I set the OTP fuse bit for “Closed configuration” which tells the i.MX6 on-chip bootloader to only run correctly signed images. I take a deep breath, hit the reset button on the board and, nothing. Nada. No boot messages. Uh-oh. Hit reset again, still nothing. Oh dear. “How much does this board cost again?”.
After while, a section was found in one of the guides mentioned above AN4581: Secure Boot on i.MX50, i.MX53, and i.MX 6 Series using HABv4, in Rev 0, section 7.1: “Troubleshooting: SRK Authentication for i.MX 6 Series in Open Configuration” which reads:
“There is a known limitation about the verification of the SRK table in the ROM of i.MX 6 Series devices. In these devices, the intent was to only verify the SRK table hash, when the SRK fuse field was non-zero for Open configuration. However, for i.MX 6 Series in Open configuration, the HAB always skips the verification of the SRK table, regardless of whether the SRK fuse field has been provisioned or not. This means that it is necessary to ensure that the SRK field is correctly programmed, prior to moving the i.MX 6 Series security configuration to Closed. It is highly recommended to use the srktool included as part of the CST release. The byte ordering of the SRK table hash value should be correct to ensure proper operation.”
What I took this to mean is that, if the CST script is told to create 4 key pairs (It was) but then not all 8 SRK hashes are burnt into the fuses, then this should throw HAB errors in open configuration mode when verifying the SRK hash table, but it doesn’t do the verification in open mode, due to the “known limitation”. Then when the chip is put into closed configuration, verification of the SRK hashes fails, and there is no boot.
Talking to the chip
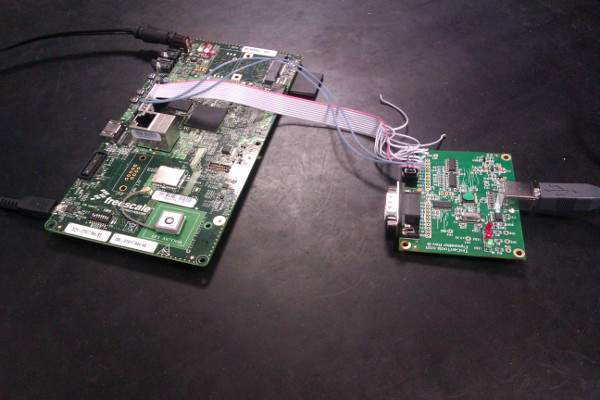
After pondering the situation for a few minutes, I thought: “Well, if I can get control of the chip using JTAG, I could poke enough registers to get the OTP controller running and program the rest of the SRK hash fuses”. After rummaging around the office I found a Flyswatter made by TinCanTools. Without a suitable JTAG adapter cable a quick bit of improvisation got it hooked up to the SABRESD board:
|
Next I downloaded the latest release of OpenOCD, at the time that was version 0.7.0. Extract, and build:
$ ./configure --enable-ft2232_libftdi
$ make
I tweaked the config file tcl/interface/flyswatter.cfg, as the enumerated USB device name didn’t match on my PC:
interface ft2232
#ft2232_device_desc "Flyswatter"
ft2232_layout "flyswatter"
ft2232_vid_pid 0x0403 0x6010
Given the poor wiring, I found I had to lower the clock rate for the JTAG signalling down to 100 KHz in tcl/target/imx6.cfg:
#jtag_rclk 1000
#$_TARGETNAME configure -event reset-start { jtag_rclk 1000 }
adapter_khz 100
$_TARGETNAME configure -event reset-start { adapter_khz 100 }
I just ran OpenOCD without installing:
$ sudo src/openocd -f tcl/interface/flyswatter.cfg -f tcl/target/imx6.cfg
After changing a wire and running it a few times, it eventually worked:
Open On-Chip Debugger 0.7.0 (2013-11-13-08:50)
Licensed under GNU GPL v2
For bug reports, read
	http://openocd.sourceforge.net/doc/doxygen/bugs.html
Info : only one transport option; autoselect 'jtag'
Warn : imx6.sdma: nonstandard IR value
adapter speed: 100 kHz
Info : clock speed 100 kHz
Polling target imx6.cpu.0 failed, GDB will be halted. Polling again in 100ms
Polling target imx6.cpu.0 failed, GDB will be halted. Polling again in 300ms
Info : JTAG tap: imx6.dap tap/device found: 0x4ba00477 (mfg: 0x23b, part: 0xba00, ver: 0x4)
Info : TAP imx6.sdma does not have IDCODE
Info : JTAG tap: imx6.sjc tap/device found: 0x2191c01d (mfg: 0x00e, part: 0x191c, ver: 0x2)
Info : imx6.cpu.0: hardware has 6 breakpoints, 4 watchpoints
Polling target imx6.cpu.0 succeeded again
At this point, the OpenOCD command prompt is available on the server running by default on port 4444:
$ telnet localhost 4444
> halt
number of cache level 1
imx6.cpu.0 cluster 0 core 0 multi core
target state: halted
target halted in Thumb state due to debug-request, current mode: Supervisor
cpsr: 0x400001f3 pc: 0x00000fb6
MMU: disabled, D-Cache: disabled, I-Cache: enabled

> reset
adapter speed: 1000 kHz
JTAG tap: imx6.dap tap/device found: 0x4ba00477 (mfg: 0x23b, part: 0xba00, ver: 0x4)
TAP imx6.sdma does not have IDCODE
JTAG tap: imx6.sjc tap/device found: 0x2191c01d (mfg: 0x00e, part: 0x191c, ver: 0x2)
Locking debug access failed on first, but succeeded on second try.
DEPRECATED! use 'cortex_a' not 'cortex_a8'
A few commands to try at the prompt for starters included:
cortex_a dbginit
halt
reset
reg
resume
halt
reg
Soon I established that some registers in the on-chip register set are unaccessible after reset, including:
RAM, not initialised:
> mdw phys 0x10000000 1
SRC_BASE_ADDR:
> mdw 0x20d8000 1
Accessing those causes:
JTAG-DP STICKY ERROR
MEM_AP_CSW 0x28000d2, MEM_AP_TAR 0x10000000
JTAG-DP STICKY ERROR
MEM_AP_CSW 0x28000d2, MEM_AP_TAR 0x10000000
Block read error address 0x0
in procedure 'mdw'
The only way out of getting that message on all further memory accesses is to then reset the board with the reset button, then halt again.
After some research I eventually found that the way to access AHB-AP registers via JTAG on the i.MX6 is with the following OpenOCD command:
> dap apcsw 1
Snatching a boot from the jaws of brickery
Having established that I could still talk to the four CPUs on the i.MX6 over JTAG, the plan then was to script enough register accesses to effect the remaining SRK efuse burns through the OTP controller. After a quick rethink, I decided it may be quicker to initialise the DRAM, then load and run some code instead.
Shortly afterward I found an example OpenOCD config for the SABRESD to setup the DRAM on the Freescale forums. You can grab my version of sabresd.cfg with a few small tweaks.
I Ran OpenOCD with this extra board config file, after placing it in the tcl/board subdirectory:
$ sudo src/openocd -f tcl/interface/flyswatter.cfg -f tcl/target/imx6.cfg -f tcl/board/sabresd.cfg
[sudo] password for elangley:
Open On-Chip Debugger 0.7.0 (2013-11-13-08:50)
Licensed under GNU GPL v2
For bug reports, read
	http://openocd.sourceforge.net/doc/doxygen/bugs.html
Info : only one transport option; autoselect 'jtag'
Warn : imx6.sdma: nonstandard IR value
adapter speed: 100 kHz
trst_and_srst srst_pulls_trst srst_gates_jtag trst_push_pull srst_open_drain connect_deassert_srst
adapter speed: 1000 kHz
jtag_ntrst_delay: 1000
ddr_init
Info : clock speed 1000 kHz
Polling target imx6.cpu.0 failed, GDB will be halted. Polling again in 100ms
Polling target imx6.cpu.0 failed, GDB will be halted. Polling again in 300ms
Info : JTAG tap: imx6.dap tap/device found: 0x4ba00477 (mfg: 0x23b, part: 0xba00, ver: 0x4)
Info : TAP imx6.sdma does not have IDCODE
Info : JTAG tap: imx6.sjc tap/device found: 0x2191c01d (mfg: 0x00e, part: 0x191c, ver: 0x2)
Info : imx6.cpu.0: hardware has 6 breakpoints, 4 watchpoints
Polling target imx6.cpu.0 succeeded again
Then at the OpenOCD command prompt, run the function from sabresd.cfg which will setup the DRAM and test a read access:
> ddr_init
> mdw phys 0x10000000 1
0x10000000: 5ed7deee
Et voila!
Now at this point, by default OpenOCD is also running a GDB server on localhost port 3333, which a suitable GDB targetting the appropriate architecture can use to control the target. This allows an ELF file to be loaded, such as say, u-boot:
$ /opt/arm-2009q1/bin/arm-none-linux-gnueabi-gdb u-boot
GNU gdb (Sourcery G++ Lite 2009q1-203) 6.8.50.20081022-cvs
Copyright (C) 2008 Free Software Foundation, Inc.
License GPLv3+: GNU GPL version 3 or later <http://gnu.org/licenses/gpl.html>
This is free software: you are free to change and redistribute it.
There is NO WARRANTY, to the extent permitted by law.  Type "show copying"
and "show warranty" for details.
This GDB was configured as "--host=i686-pc-linux-gnu --target=arm-none-linux-gnueabi".
For bug reporting instructions, please see:
<https://support.codesourcery.com/GNUToolchain/>...
(gdb) target remote localhost:3333
Remote debugging using localhost:3333
0x00000fc4 in ?? ()
(gdb) load u-boot
Loading section .text, size 0x23804 lma 0x27800000
Loading section .text.init, size 0x138 lma 0x27823804
Loading section .rodata, size 0x44573 lma 0x2782393c
Loading section .data, size 0x163c lma 0x27867eb0
Loading section .u_boot_cmd, size 0x6ac lma 0x278694ec
Start address 0x278006e0, load size 433047
Transfer rate: 9 KB/sec, 14434 bytes/write.
(gdb) info reg
r0             0x0	0
r1             0x0	0
r2             0x900000	9437184
r3             0x800	2048
r4             0x0	0
r5             0x0	0
r6             0x94	148
r7             0x4a	74
r8             0x9024b4	9446580
r9             0xb0000	720896
r10            0x0	0
r11            0x0	0
r12            0x0	0
sp             0x93ff9c	0x93ff9c
lr             0xcfd	3325
pc             0x278006e0	0x278006e0 <_start>
fps            0x0	0
cpsr           0x600001d3	1610613203
(gdb) c
Continuing.
Now switch back to the serial port terminal and Lo! there is a U-boot prompt waiting for us. At that point I carefully burnt in the rest of the SRK fuses, and after a push of the reset button, the signed binaries were running.
Conclusions
When all seemed lost above, and the first halt command was issued at the OpenOCD prompt, the program counter was at 0x00000fb6. This address is within the mask ROM on-chip bootloader. Successive resumes and halts show the pc register spinning around close to this address. This takes some of the mystery out of the secure boot framework on i.MX6. The bootloader is simply checking the values in the SRK fuses with some (albeit complex) cryptographic operations, and if they don’t work out, and the closed config fuse bit is set, simply spins forever, halting the boot. The chip remains otherwise entirely functional, and can easily be overtaken by means other than the bootloader in order to get it running code, as we have done.
Caveats
If you want to try a bit of JTAG debugging on i.MX6 with OpenOCD yourself, here are a couple of things I observed when using it with this particular SoC:
- When power cycling or resetting the board with the button, you need to quit and re-run OpenOCD.
- When resetting with any method, you need to redo the target remote command in GDB.
Otherwise, OpenOCD will look like its working, but gather incorrect CPU register values, which can get very misleading.
Have fun!